Working with Administrative units in the Office 365 Admin Center
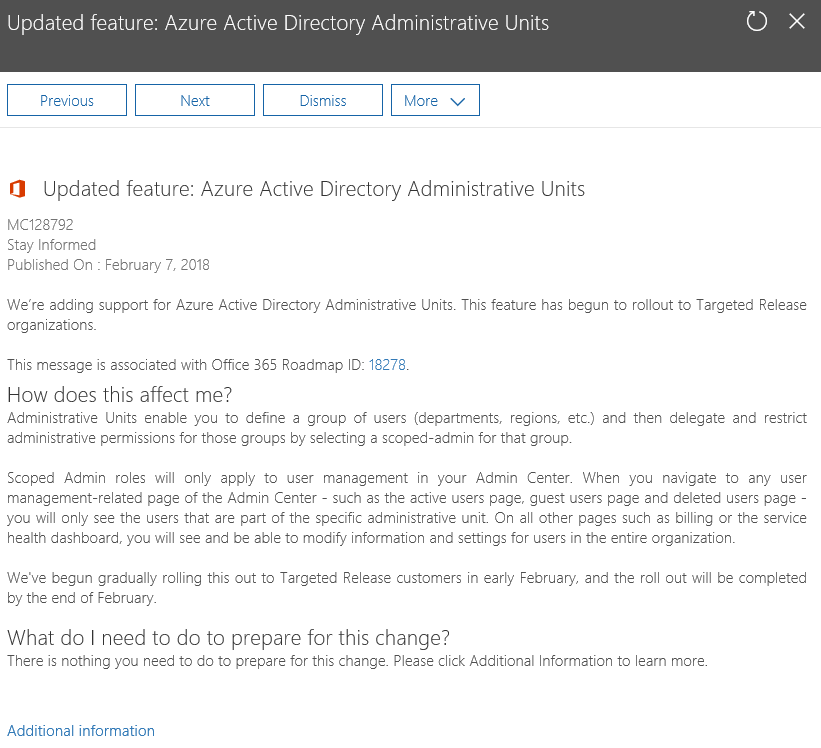
As of two weeks ago, an update that incorporates the Administrative units feature into the Office 365 Admin center has started rolling out across the service. The rollout was announced with an update to the corresponding Office 365 Roadmap item and the following Message Center post:
As neither the Roadmap items, the Message center post, nor the linked “documentation” are very descriptive as to what exactly the feature does, and how to configure it, we thought it might be useful to dig into this feature a bit more, and publish some guidance on Administrative Units.
What are Administrative units?
Simply put, Administrative units (we’re going to call these AUs from here on in) are a container for user objects, akin to Organizational Units on-premises. AUs allow you to “group” your users into logical units, which makes it easier to designate them as a whole. For example, you could create an AU for: all the users in the Sales department, or all users working in the UK, or simply all users with a particular attribute. As there are very few limitations in terms of who can be a member of an AU, you can get very creative with them – but we will talk more about this in the next section.
So, why are AUs important? After all, simply grouping the objects in some logical unit doesn’t necessarily help to ease the administrative burden. The real power of the “Administrative units” feature is the ability to designate an admin user that will be able to perform various tasks against all users in the scope of a particular AU – and only those users! This is very important for large organizations in Office 365, as up until now we didn’t have any features that enabled admin role separation. Yes, there are “limited” admin roles in Office 365, however anyone with the user management role would still be able to manage all users in the company (with the exception of Global admins). Do you really want the junior guy from the service desk to be able to reset the password for the CFO? No? Then AUs can help.
Now, my previous statement is not entirely true as to the availability of this feature. In fact, AUs have been available for over 3 years now, as you can see from the “announcement” blog post, dated December 2014. This has the exact same feature set however they were only enforced against actions performed via the Azure AD PowerShell cmdlets, which made them less useful. With the Office 365 Admin Center finally getting support for AUs, they should gain more traction. So let’s see how they work.
Managing Administrative units
Unfortunately, management of AUs is still only possible via PowerShell. It’s not a particularly complex task, but the process can be off-putting for folks not used to the shell. Especially after a first glance into the “documentation”, which is basically a few PowerShell scripts with very minimal description. Still, following the examples should be relatively simple.
To get started, you will need either the Azure AD PowerShell module or its older sibling, the MSOnline module. As the Microsoft article above covers the Azure AD cmdlets, we decided to use the MSOnline cmdlets instead.
In order to create a new AU, you can use the New-MsolAdministrativeUnit cmdlet. Note that the cmdlet does not require any parameters, and in fact the only parameters it accepts are –DisplayName and –Description. It’s all you need to provision the “container”. In this example, we will create a new AU that will be used to delegate management to the user objects corresponding to shared mailboxes only:
New-MsolAdministrativeUnit -DisplayName “Shared mailboxes only” -Description “Includes all user objects corresponding to Shared mailboxes”
Once the new AU is created, you can update its properties via the Set-AzureADAdministrativeUnit cmdlet or remove it with Remove-AzureADAdministrativeUnit. To list all AUs configured in the tenant, use the Get-AzureADAdministrativeUnit cmdlet.
Simply creating an AU doesn’t change anything though. It’s an empty container at this point. Next, you should assign some users to it, and in order to do that, use the Add-MsolAdministrativeUnitMember cmdlet. All you need to do is specify the objectID of the user, and the objectID of the corresponding AU. Rinse and repeat for all users you want added:
Add-MsolAdministrativeUnitMember -AdministrativeUnitObjectId 6ee4baa4-f864-4467-9cd2-f0832a323546 -AdministrativeUnitMemberObjectId (Get-MsolUser -SearchString sharednew).objectId
There are no other parameters you can use to designate membership of the AU. No –Department for example, no –Country. More importantly, there’s no dynamic membership – which means that you need to get the list of user objects you want added to the AU manually, and keep it up to date. For example, if you create an AU for all your Sales users, your newcomer ‘Sally’ will not be automatically added to it, regardless of the fact that her Department attribute is correctly configured. On the other hand, having to manually provide the user objects means you can mix and match them as you see fit.
To list the current members of a particular AU, use the Get-MsolAdministrativeUnitMember cmdlet. To remove users, use the Remove-MsolAdministrativeUnitMember one.
Delegating access via Administrative units
Now that we have at least one AU created, we can get to the important bit – delegating admin permissions. You can designate one or more user that will be able to perform various tasks against all the users in the AU, and just those users. In other words, you are creating a “scoped” administrative role, which is reflected in the name of the corresponding PowerShell cmdlet, Add-MsolScopedRoleMember.
Similarly to the RBAC model employed by Exchange and other workloads, you are basically creating an “assignment” between some administrative role and a delegate, with a scope limited to the AU members. The only roles that you can assign in this scenario are the User Account Administrator or Helpdesk Administrator roles. For example, if we want to assign the User Management role to some user and limit it to only cover the members of the AU we created above, we can use the following:
Add-MsolScopedRoleMember -RoleObjectId fe930be7-5e62-47db-91af-98c3a49a38b1 -AdministrativeUnitObjectId 6ee4baa4-f864-4467-9cd2-f0832a323546 -RoleMemberUserPrincipalName user@domain.com
To obtain the RoleObjectId, use the Get-MsolRole cmdlet. The ObjectID of the AU we created above will be shown upon creation or can be obtained via Get-AzureADAdministrativeUnit. Lastly, you need to specify the UPN or ObjectId of the delegate.
To get the current list of delegates for either the User Account Administrator or Helpdesk Administrator roles, use the Get-MsolScopedRoleMember cmdlet. To revoke the access, use the Remove-MsolScopedRoleMember cmdlet.
Testing AUs in the Office 365 Admin center
We are now ready to test it all out in the Office 365 Admin center. Assuming the user does not have any other Office 365 role assigned, this is what he will see once he opens the Admin center and browses to the Active users page:

As you can see from the screenshot above, only the user we explicitly added to the AU above is visible in the portal, therefore our delegate cannot perform actions against other users. It is important to understand that this is a restriction enforced by the Admin center, not the actual AU feature. The delegate will still be able to see all users if he logs in to the PowerShell module, but will not be able to perform any actions against users not in the AU scope.
If there are multiple AUs created in the tenant and assigned to the delegate, he will be able to switch between them via the scope dropdown in the top right corner. If the user has other Azure AD/Office 365 roles assigned, he might still be able to see the full list of users. Selecting any user outside of his scope however will result in restrictions applied to the UI controls. For example, note the lack of Reset password or Delete user buttons in the below screenshot:

In addition, the Edit link next to each section in the UI will be either removed or it will take you to restricted version of the corresponding controls, as shown in the image on the right-hand side – in the Product licenses pane. The actual controls on the Active user page are also limited (in case you failed to spot this on the first screenshot above). Even if you bypass the UI restrictions, attempting to perform any action that is outside of the AU scope should result in an error.
Lastly, it’s important to understand that Administrative units only cover actions performed against Azure AD. This means that the controls for managing Exchange or OneDrive for Business functionalities will not be exposed, even though the User Account Administrator role gives certain permissions to those workloads when assigned directly.
Better administration and management of Office 365
The Administrative units feature is not new, but it has finally been improved to cover the actions performed in the Office 365 Admin center. This is a welcome change, as the feature only worked against PowerShell previously.
While the feature leaves a lot to be desired in terms of configuration and customizability, it’s still a very important step towards the ultimate goal – having proper RBAC controls across all of Office 365, or at least Azure AD. Even though the feature has certain limitations, it will undoubtedly help organizations that have the need to scope Office 365 management tasks based on some criteria.