Office 365 Anti-Spam Settings
Office 365 now allows you to configure and manage your organisations Anti Spam settings right there in the Office 365 Administration console.
This is a big improvement over the older Wave 14 Office 365 which dealt with spam in an entirely different system called FOPE – which most tenants did not get access to.
You can see how much Spam is getting filtered in your organisation by learning more about our Office 365 reporting software. Our reports track the amount of spam your company has received over time, so you can see if this trend changes after customising your spam settings.
Getting access to the Spam settings is as easy as going to the Exchange Admin Center.

Exchange Admin Center
Once you are there, click on the Protection link in the left hand Navigation Menu and select Content Filter in the top menu.

Content Filter Settings
Office 365 Default Spam Settings
We will start by examining the Default content filter settings, which basically move all detected spam into the users Junk E-Mail folder.

Default Content Filter Actions
You will notice that you can apply actions for two different levels of Spam:
Spam: This is what Office 365 considers to be likely spam. This may include some false positives from time to time so you are advised to configure an action that allows the user to check and recover these messages if required.
High Confidence Spam: This is what Office 365 thinks is most definitely spam and you can apply a more aggressive action. We would still recommend not automatically deleting these messages as no Anti-Spam system is foolproof. As an Administrator, you can modify the default action taken when a Spam email is detected. You have the following options:
Move message to Junk Email Folder: This will move the suspected spam email to the Junk E-Mail folder in the user’s mailbox.
Add X-Header: This will add an X-Header of your choosing to the suspect email message. You can choose the X-Header text you want to add using the text box lower down in the page. You must use this action, in conjunction with a transport rule, if you want to replicate the Move message to Junk Email folder for on-premise mailboxes protected with Exchange Online Protection. More information.
Prepend Subject Line with Text: This is a bit of an old school setting which allows you to add something like ***SPAM*** to the front of the subject of a suspected spam email. This may be useful if you are testing particular anti-spam settings and want them to stand out. Again, you can choose the text you want pre-pended using the text box further down the page.
Redirect Message to Email Address: This option allows you to forward the suspected spam message to an email address of your choosing. You can specify the email address to forward to using the text box further down the page.
Delete the Message: This will obviously delete the suspect spam email. We don’t advise on using this setting as you may lose an important email if it is detected as spam incorrectly.
Quarantine Message: This will move the suspected message to the Spam Quarantine, which we cover later in this article. This is our recommended way of dealing with High Confidence Spam. You can specify how long a suspect spam message remains in the quarantine using the text box below. The maximum length of time you can store a message in the Spam quarantine is 15 days.
The screenshot below shows a modified version of the Default Spam settings. These will be applied to all users in your organisation.

Modified Default Spam Settings
International Spam Settings
The International Spam Settings section allows you to mark all emails detected in a specific language or from a specific country and region as spam.

International Spam Settings
You can select multiple languages or regions by holding down the control key.

International Spam Language Selection

International Spam Region Selection
Advanced Spam Settings
The advanced spam settings section allows you to deeply customise the spam filter settings.

Advanced Options
There are two types of options. Options that increase the SCL Spam Score of a message if detected and options that automatically mark a particular message as spam if it is detected.
Below is a breakdown of the options currently available:
Increase Spam Score options
Image links to remote sites: When this setting is enabled, any message with image links to remote websites will receive an increased spam score.
Numeric IP address in URL: When this setting is enabled, any message that has numeric-based URLs (most often in the form of an IP address) will receive an increased spam score.
URL redirect to other port: When this setting is enabled, any message that contains a hyperlink that redirects the user to ports other than port 80 (regular HTTP protocol port), 8080 (HTTP alternate port), or 443 (HTTPS port) will receive an increased spam score.
URL to .biz or .info websites: When this setting is enabled, any message that contains a .biz or .info extension in the body of a message will receive an increased spam score.
Mark as Spam options
Empty messages: When this setting is enabled, any message in which the body and subject line are both empty, and which also has no attachment, will be marked as spam.
JavaScript or VBScript in HTML: When this setting is enabled, any message that uses JavaScript or Visual Basic Script Edition in HTML will be marked as spam.
Frame or IFrame tags in HTML: When this setting is enabled, any message that contains the “Frame” or “IFrame” HTML tag will be marked as spam. These tags are used on websites or in HTML messages to format the page for displaying text or graphics.
Object tags in HTML: When this setting is enabled, any message that contains the “Object” HTML tag will be marked as spam. This HTML tag allows plug-ins or applications to run in an HTML window.
Embed tags in HTML: When this setting is enabled, any message that contains the “Embed” HTML tag will be marked as spam. This HTML tag allows varying data types to be embedded into an HTML document. Examples include sounds, movies, or pictures.
Form tags in HTML: When this setting is enabled, any message that contains the “Form” HTML tag will be marked as spam. This HTML tag is used to create website forms. Email advertisements often include this tag to solicit information from the recipient.
Web bugs in HTML: When this setting is enabled, any message that contains a Web bug will be marked as spam. A Web bug is a graphic that is designed to determine whether a Web page or email message has been read.
Apply sensitive word list: When this setting is enabled, any message that contains a word from the sensitive word list will be marked as spam. Using the sensitive word list allows easy blocking of words that are associated with potentially offensive messages. Some of these words are case sensitive. As an administrator, you cannot edit this list. Filtering against the sensitive word list is applied to both the subject and message body of a message.
SPF record: hard fail: When this setting is enabled, messages that hard fail an SPF check will be marked as spam (SPF filtering is always performed). Turning this setting on is recommended for organizations who are concerned about receiving phishing messages. (In order to avoid false positives for messages sent from your company, make sure that the SPF record is correctly configured for your domains.)
Conditional Sender ID filtering: hard fail: When this setting is enabled, any message that hard fails a conditional Sender ID check is marked as spam. Turning this setting on is recommended for organizations who are concerned about phishing, especially if their own users are being spoofed. This option combines an SPF check with a Sender ID check to help protect against message headers that contain forged senders.
NDR backscatter: When this setting is enabled, any message that matches the non-delivery report (NDR) bounce characteristics will be marked as spam. It is not necessary to enable this setting if your organization uses Exchange Online Protection to send outbound mail.
Block all bulk email messages: When this setting is enabled, any message that is identified as bulk mail, such as advertisements and marketing emails, will be marked as spam.
You can (and should) choose to test these settings before you apply them into production. There are two options at the bottom of the Advanced Settings page that allow you to add an X-Header or BBC the suspect email to a special address rather than applying the Spam action you’ve chosen previously.
Creating Multiple Spam Policies
There may come a time when you have a group of users that have different spam requirements from the default. You can create an additional policy with different settings and apply it to users in a particular domain or security group.
In our example below, we will apply a weaker anti-spam policy for our Administrators
To get started, click the + button in the Content Filter section to create a new policy. Give it a name, description and select the actions you want. The types of actions are the same as the ones in the default policy above.

Administrators Content Filter Policy
You can also select customised International Spam and Advanced settings for this policy.
Now scroll down to the bottom and choose who this policy applies to. The options are:
The Recipient Is…: Using this option you can specify users directly that this policy will apply to. Useful if the director or CEO is complaining about SPAM and needs a custom setting!
The Recipient Domain Is…: This setting allows you to apply a custom spam policy to all recipients in the same domain.
The Recipient is a member of… This allows you to apply a policy to all members of an Exchange Online Security group, which is the option we have chosen in our example below.

Administrator Content Filter Application
Click Save and you will see the policy listed in the content filter settings. You can have multiple policies and re-order them however you wish to make sure they apply correctly.

Both Policies in Content Filter Settings
Quarantined Messages
The Quarantine section of the Protection area holds all the messages that have been quarantined by a content filter setting. This only captures messages if you apply a quarantine action as mentioned above.

Quarantine
Most companies will receive loads of spam making it a little difficult to find that false-positive needle in the quarantine haystack.
You can use the Advanced Search feature to find a particular message based on the criteria shown in the screenshot below. This is very useful for finding an email when a user has not received an email they are expecting.

Advanced Search
Once you’ve found the message you’re looking for you can double click it to bring up the message properties and options.
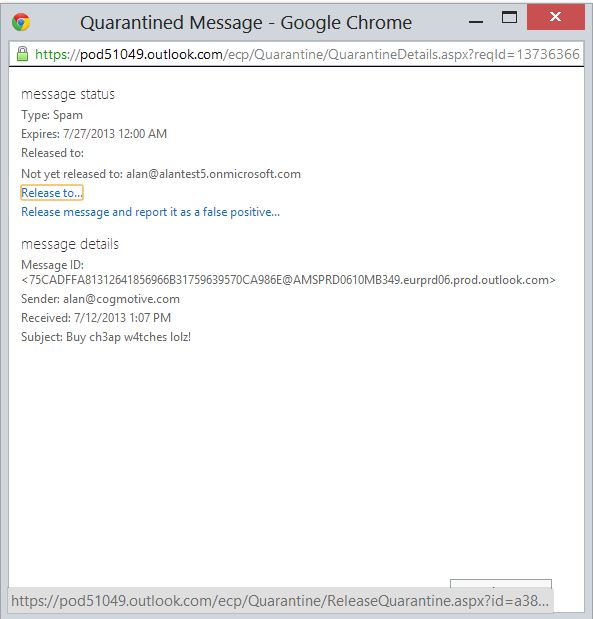
Quarantined Message Properties
You can choose to release the email to one or all of the recipients and mark it as a false positive to make sure that this type of message isn’t captured next time.
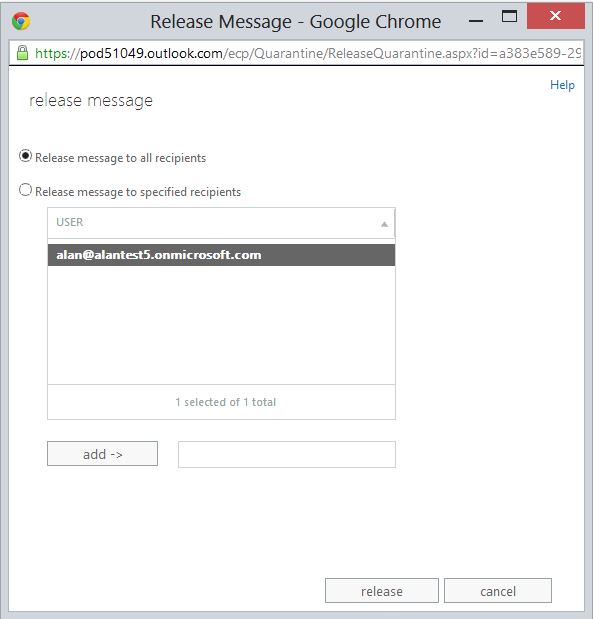
Release an Email
To manage the Quarantine a user needs to be in both the Organization Management and Hygiene Management Administrative roles.
So there you have it! Everything you need to know about Exchange Online Content Filtering settings and Quarantine management!
Take the next step towards advanced SaaS management with our Office 365 management software.